So you want to make money blogging but your posts are big B boring, right?
People come to your post, look around for a second, and leave.
One way to solve this problem is to use an image editor to create pictures your readers will want to look at.
But it’s one thing to create images, it’s another to know how to use them to keep people on your blog.
This brings up 2 questions:
- What kinds of images do you need to keep your readers interested?
- Where can I find a professional image editor that doesn’t cost a lot?
In this post, I’m going to tell you about an affordable image editor you can use to create pictures for your posts. After that, I’m going to show you what kinds of images you’ll need to make to keep your readers on-page and reduce your bounce rate.
It’s important to solve these two problems because the competition is fierce when you want to make money blogging.
Why You Need an Image Editor to Spice Up Your Content
Research shows that the first 10 seconds are critical.
Within that amount of time, the reader decides whether or not it is worth hanging around.

And if your readers aren’t hanging around you won’t make money blogging…That’s for sure.
Usually, people are very skeptical of your site, to begin with. This is because they’ve probably gone to other sites and wasted their time, now they’re skeptical of the next site they go to.
Either that or they’re greeted with a page that looks like this:
So you’ve got to spice it up a bit and an easy way to do that is by adding interesting and relevant images.
But before we do that, you’ll need an image editor to help you with that.
Why Corel Paintshop Is The Photo Editor You Need
The first thing people think about when you mention buying an image editing program is Adobe Photoshop. And PS is awesome, no question about it.
But there are 3 things that make it a bad choice for most bloggers.
1. It’s rather expensive for the average blogger. When you add up hosting fees, pay for your Internet, get templates for your site, etc. you don’t need to spend another $30.00 a month. If you’re just starting out and want to make money blogging you have to consider these expenses.
2. Photoshop is a high-end program, meaning that it has been made for experienced professionals. I’m not saying you can’t learn it, but many of the functions of Photoshop will be beyond the scope of what you’ll need.
3. Because it’s a huge program, it’ll take time for you to learn it. If you’re blogging you won’t have the time to use most of it anyway.
In contrast, Corel’s Paintshop has some advantages for the average blogger.
1. It was not expensive. I bought mine on a Black Friday sale on Amazon for $35. (It usually retails for $70.)
2. It’s not as extensive as Photoshop, so you can learn it in no time. Matter of fact, I taught 7th graders how to use most of it in about a month.
3. I’ve been using it for blogging for several years now and it’s perfect for creating images you can use.
But at the end of the day, it’ll be your decision on which image editor to use. If you want to see how easy it is to use Paintshop, click here: How to Use Paintshop.
Use Interesting Pictures Will Help You Make Money Blogging
As I said before you’ll want to use eye-catching, interesting pictures to keep readers interested. But what kind of pictures will you create and use for your posts?
Here are a few ideas to get you started.
Idea #1 Use images of people, especially their faces.
Images of people will draw more attention to your blog posts. But don’t try to use stock images, use real pictures if you can.
And if it’s a choice between some text and a person’s face, the face wins every time.
As you can see, heat maps reveal exactly where our eyes are drawn to. After seeing this, it’s a no-brainer as to the kind of images you’ll need to use.
Usually, the faces at the top of a post are looked at the most and if the subject is an attractive female, the fixation is higher.
Believe it or not, the only subject that seems to trump images of women’s faces is the faces of babies.
Idea #2 Place Images at the Begining of Your Posts
Here’s a tip I got from reading a post on Problogger: If you have some information that you want people to remember, then place an image right at the beginning of your post.
People have a tendency to remember the first thing that they see and if it is an image it will stay in their minds longer. That means if the image has information on it that you’d like them to remember and it’s dynamic enough, they will remember you and your blog.
Another thing you’ll want to do is use images frequently throughout your posts if you want to make money blogging.
Idea #3 If You Can, Make Your Own Images Instead of Stock Images
Believe it or not, a reader will leap over a stock image every time. For some reason, we’re drawn to natural images rather than staged ones.
It turns out that images of stock photographs get ignored and skipped over if it does not add value to your content.
So, you need to make sure that your images are highly relevant to your content.
Here are guidelines for creating and using images on your site that will add to the value of its content.
- Using an image of yourself as a way to extend a personal offer or to make your message more real.
- Helping to explain a concept. (Like using images to explain how to do something.)
- Adding visuals like infographics to make your content more interesting.
- Adding charts and graphs from credible sources to back up your data.
- To help emphasize a point.
Idea #4 Optimize Your Pictures for SEO
Ever since the Internet went household, everyone knows that images need to load fast as a chased rabbit. I remember back in the early 1990’s online webmasters and SEO gurus had the 10-second rule.
If your page didn’t load up in 10 seconds or less. In an age of faster bandwidth speeds and highly competitive online companies, the 10-second rule has become more like the 5-second rule.
Akamai, a leading content delivery network conducted a study that showed 2 seconds was the new threshold for waiting for a webpage to load up.
So, the question of the day is, how can you alter your images for fast delivery?
Optimizing Pictures in Paintshop Image Editor
If you already have a program like PhotoShop or Paint Shop, you will have an optimizer, because it’s already built into the program. However, if you don’t have one of those programs, don’t fret, you can use an online optimizer.
One of the sites that you can use is a site called Image optimizer. The thing I like about Imageoptimizer is that it is so easy to use.
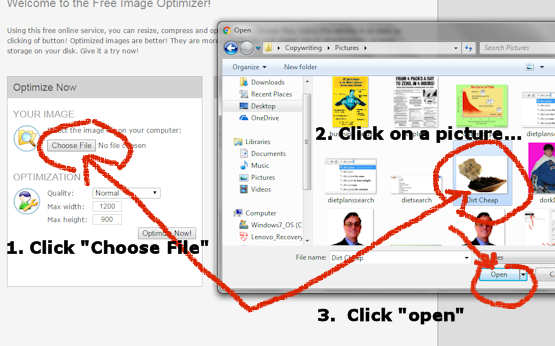
All you have to do to use the Imageoptimizer is:
Step 1: After navigating to the site, click on choose file
Step: 2 After you click on your file, click on the picture that you want to optimize.
Step 3: Click “Open”.
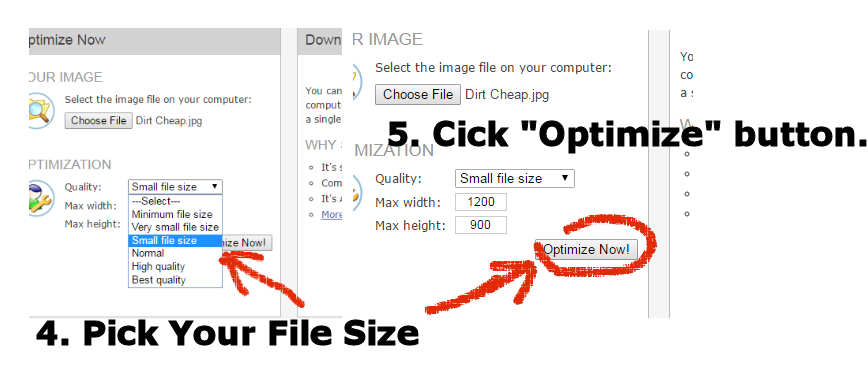
Step 4: Choose your file size. There are 6 different sizes ranging from “Best Quality” (Large file) to “Very Small”.
Step 5: Click the optimize button. (Optimize Now!)
Step 6: Once you click the “Optimize Now!” button, a new page will open up and you can click the download button.
Idea #5: Make sure you use the “Alt” tag when you post your images for SEO.
Whenever you add a picture to your blog or website you will see an option to add an “Alt” tag to your image. This is what is known in web design language as an “attribute” (or in this case the “alt attribute”).
The reason why this tag is so important is that most search engine’s programs can’t look at an image and know what it is; there has to be a text representing the image. ( Don’t blow this off. If you want to make money blogging, then these little tips come in really handy.)
Also, if the image on a page fails to load or takes too long to load up, you’ll see the image tag in its place. This will at least let the viewer know what image was supposed to be on the site.
When search engines scan your site they scan it using highly sophisticated programs. Even though these programs are very advanced, they won’t be able to actually see what images are on your site.
They have to rely on the text that you supply them.
How to Add the “Alt” Tag
In the language of the web, HTML coding is relatively simple. To place words into your alt tag all you have to do is add the attribute like so:
When you are using an html editor like Dreamweaver, the program will ask you what name to put into the ALT field.
If you are writing the code yourself, you can add the tag yourself just like the image above.
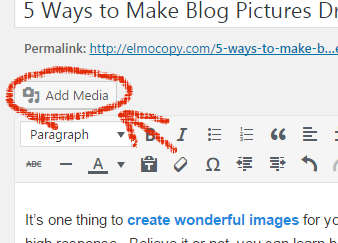
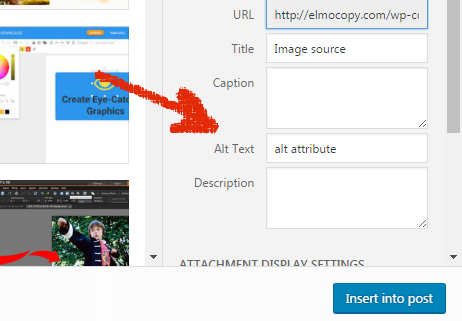
When I was putting together this post, I used the add media feature to place these pictures into my blog. This makes it super easy for anyone to add an ALT tag to their blog posts.
Step 1:
Click add media in your WordPress word processor.
Step 2:
Upload your image into WordPress.
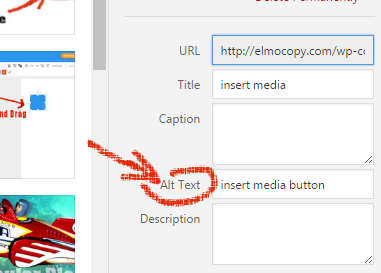
Step 3:
In the Alt Text area, type in your Alt attribute.
Step 4: Click the Insert into post button.
That’s really all there is to it!
Key tasks to do when optimizing Alt tags:
1. Try to use the same keywords for your images as what the pictures actually are. If you can tie other keywords from your post to your images, so much the better, but don’t overdo it. As I mentioned before, many of these menial tasks will help you make money blogging, but they should not be ignored.
(Example: If you’re writing about goldfish in your post and try to rank for that term, then make your ALT tag=”goldfish” instead of just “fish”. However, don’t overdo it with that. You only want to tag that term if it is actually a picture of a goldfish.
2. Try to keep the text of your alt tag as short as possible. They are more easily indexed by search engines, especially Google.
3. Don’t use only one search term on all of the Alt tags. If you do too much of that it may seem like keyword stuffing.
Make Sure Your Images Are Indexed Correctly
It’s always a chore to make sure that your images get indexed properly, but it’s very important. A lot of people skip over steps like this but they’re important if you want to make money blogging.
The reason why it is important is that sometimes people are looking for a subject and they can’t find what they’re looking for. Then out of sheer frustration, they start surfing images in the hope they may find the subject they are looking for.
(I know this is possible because sometimes I do this myself.)
That’s why alt tags are so important. If a person is looking for a site that explains how to do a certain thing, it may be far easier to find the image first.
Some people will post online how to fix or make something using more pictures than words and their site may not be on the first 20 pages of the search engine results.
If you have your keyword in the alt tags they will usually wind up in search engine image results, especially if they are of a specific nature.
Idea #6 Use Images to Explain Procedures is Important
Most people online don’t like reading a lot of text, so anytime you have a subject that requires an explanation it’s better to use images.
Tip: You can use an online program like Venngage and then alter it in an image editor like Paintshop. This will help you create great explainer images for your blog posts. See the video here: Using Venngage & Paintshop Image Editor
Total percentage of U.S. adults who are unable to read an 8th grade level book 50% Source: Statistic Brain Research
- Studies have proven that well-made images that are clear and concise can deliver more information using fewer words – increasing your engagement to almost 67% more on your site or blog.
- Using pictures can make concepts much more memorable and easier to understand
- Pictures cut through the confusion and ensure that the reader clearly “gets the message” when reading accompanying text.
- Images can be understood by just about everybody. Well presented pictures cross-cultural and educational barriers making your audience much wider.
Blogs that Use Images to Explain Concepts
Take a look at some of the top bloggers on the Internet to see what they are doing.
Neil Patel – An absolute leader in SEO and blogging. Patel knows how to cut through the crap and explain concepts clearly with simple language and great graphics. His step-by-step instructions are spot on. Check out his post on How to Write Blog Posts that Rank With Google
Envatotuts+ – This is a site that has tons of great tutorials and they use pictures and graphics a lot. For example, they have free drawing lessons that show you step-by-step on how to draw different subjects like animals. Each step is illustrated clearly with clarity so that you can learn how to draw. Envatoututs+ has tons of lessons on a wide variety of graphic design subjects.
Smashing Magazine – This is a site that uses a lot of clear pictures that show you how to complete a task, like design a beautiful website. Each part of their tutorial is accompanied by crystal clear photographs and illustrations that make learning the material interesting and understandable.
Recap and Conclusion
In order to make money blogging, you need to keep readers on your site.
Using an image editor like Paintshop will alter images in a way that will help you increase engagement and retain readers.
Also, you can do this with these tips:
- Use good, relevant pictures of people in your posts
- If you have information that you really want people to remember to place it in an image at the beginning of your post. (An infographic works great!)
- Try to make your own pictures or use pictures that don’t look like stock photos
- A picture of a woman’s face or a baby’s face gets much more attention
- Optimize your pictures for SEO and fast loading
- Make sure you use the Alt tag so that you can get your picture indexed by the search engines
- Use step-by-step images to make your message or instructions clear
If you follow these simple tips, you’ll be able to keep readers engaged and on your site longer. Don’t forget to check out some of the sites I have listed above.
If you have any comments or questions, please leave them in the comment section below.





Interesting post. Images are worth 1000 words.